Sale!
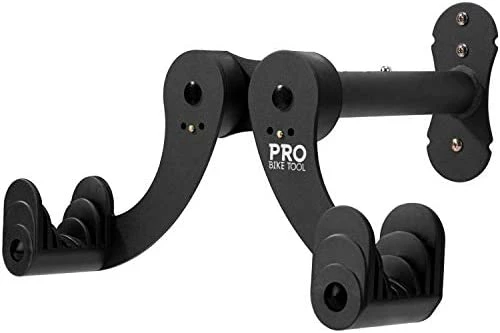
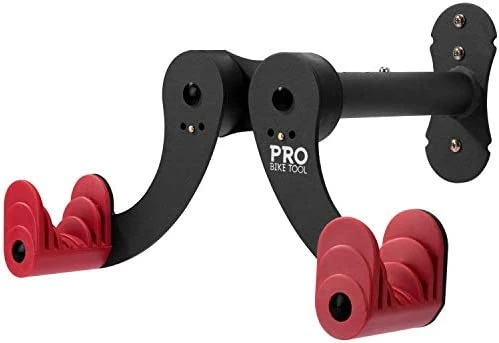

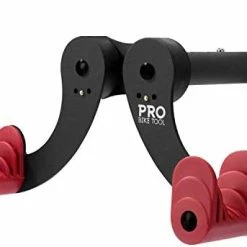
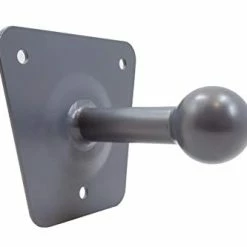
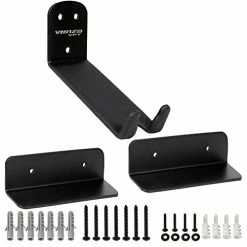
Brand new 🥰 PRO BIKE TOOL Bike Wall Mount – Horizontal Indoor Storage Rack For 1 Bicycle In Garage Or Home – Cycling Hanger – Safe And Secure Holder, Hook For Bicycles – Hang Your Road, Mountain Or Hybrid Bikes Red 🌟
Original price was: $58.99.$41.29Current price is: $41.29.
- Excellent customer service online in a timely manner
- Free 1 year warranty period
- fast shipping
- Streamlined service, designed for your convenience.

- Material: Alloy Steel
- Color: Black
- Special Feature: Holder
- Shelf Type: Hanging Shelf
- Room Type: Garage
- Save Space & Conveniently Store Your Bike – Free-up your floor space – Keep your garage or indoor space tidy and clutter-free. Our high-quality future proof wall hanging solution to bike storage is great for apartments, homes, garages and sheds. Storage system fits most bike types: road, cyclocross, hybrid and MTB. Can hold bikes up to 22kg / 48.5 lbs weight load. Note: Not suitable for bicycles with wide handlebars (31 inches / 78 cm), long wheelbases or fat bikes.
- Safe & Secure – Store your bike in a horizontal position, allowing for convenient storage and removal. Wall mount made from strong steel with scratch-proof coating. Bike arm locking mechanism uses a ‘reliable’ ratchet gear system to securely hold bikes. Wall hanger’s angle (up to 88°) can be adjusted to keep your bike level, catering for different bike frame angles, shapes and sizes.
- Easy to Install & Adjust – Detailed installation instructions and mounting screws included. Adjustable cradle arms ensure that all size and shape bicycle frames can be accommodated, with push button lock system to secure your ride. Hanger beam can be adjusted to fit all environments and widths of bicycles, extendable from 8.7 inches up to 12.6 inches – secured using secure push button mechanism.
- Scuff-Free Storage – Arm ‘cradles’ made from soft TPR rubber material that will not scratch your bike, whether aluminium, titanium, carbon or steel. Cradles protect frame finish and holds complex tube shapes with no concern for marking or movement. Supplied with ultra-strong elasticity rope to loop around front wheel and bike frame, to prevent front wheel knocking against your wall.
- Pro Quality – We’re so confident about our top-quality racks that if you have any product issues, we’re very happy to either provide a Refund or a Replacement on your purchase! We’re also here to support you if you have any questions or queries, please get in touch and we’ll gladly help. Important: Only install bike wall hanger on a solid stud, beam, masonry or concrete wall. Do not install on ‘unsupported’ wall surfaces e.g. plasterboard wall unless there is a strong wooden stud behind it.
| Color | Black, Red |
|---|
8 reviews for Brand new 🥰 PRO BIKE TOOL Bike Wall Mount – Horizontal Indoor Storage Rack For 1 Bicycle In Garage Or Home – Cycling Hanger – Safe And Secure Holder, Hook For Bicycles – Hang Your Road, Mountain Or Hybrid Bikes Red 🌟
Add a review
Related products
Sale!
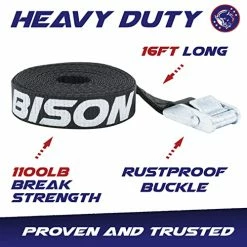
Car Racks, Transportation & Storage
Original price was: $15.99.$11.19Current price is: $11.19.
Sale!
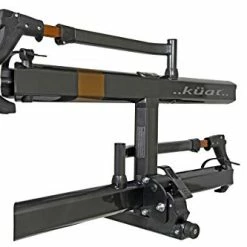

Car Racks, Transportation & Storage
New 💯 Racks Sherpa 2.0-2 Bike Rack Black Metallic/gray Anodize 🧨
Original price was: $246.00.$91.00Current price is: $91.00.
Sale!


Car Racks, Transportation & Storage
Original price was: $58.99.$41.29Current price is: $41.29.
Sale!
Car Racks, Transportation & Storage
Original price was: $49.98.$34.99Current price is: $34.99.
Sale!

Car Racks, Transportation & Storage
Original price was: $31.63.$22.14Current price is: $22.14.
Sale!

Car Racks, Transportation & Storage
Original price was: $134.96.$84.00Current price is: $84.00.
Sale!
Car Racks, Transportation & Storage
Original price was: $19.99.$13.99Current price is: $13.99.
Sale!

Car Racks, Transportation & Storage
Original price was: $39.95.$27.97Current price is: $27.97.
BLS –
I bought two of these so far.Installation is very straightforward, especially if you can screw directly into studs. Otherwise, ditch the provided wall anchors and get yourself some simple toggle bolts at your local hardware store. My first hanger went straight into a stud and is very, very sturdy. Spacing between the hangers worked out such that I used toggle bolts for the second. It’s also very, very sturdily mounted. The instructions mention attaching a wooden base to the wall and then attaching the hanger to the base. I didn’t have a need for this.I extended my hanger as far away from the wall as possible in both cases.. This gives ample room between the wall and handlebars for both road and mountain bikes. Having the hanger extended also makes hanging the bike a little easier for me in my case.Each hanger bar can swing and lock into one of three positions so there is a total of nine combinations. Hanging bikes with straight or slightly sloping top tubes is pretty simple. If a bike points downward you can lift the right hanger or lower the left. I initially wanted to use my first kit for my fat bike but the frame geometry is such that the main triangle is very oddly shaped and too far extreme to have the bike level with the ground. The rubber covered tapered hooks for the frame are rather chunky and slipping them into some frame geometries may be difficult, especially if your frame is small. I can’t even imagine how difficult it could be if you have suspension in there getting in the way of the perfect position.The system is generally stable even though the bike can rock on the hanger base a bit. I wish there was some way to bolt down the extended hanger to the base but maybe it’s not necessary. Not a big deal. Even with the rocking the bike isn’t going anywhere unless the base rips out of the wall. In that case you got a whole ‘nuther set of problems to deal with.So, overall, 4 out of 5 stars. The system had some thought put into it and may be good enough for what I need it to do. I understand its limitations and I’m ok with that. Remember, you’re hanging a bike … not launching a rocket to space.
R. Pagni –
This is a great bike storage system, highly recommend. Ok, enough about how great it is. For me, I want to know tips how to install it and you probably do too. As you can see, I installed 3 holders. First step was to find the studs behind the sheet rock. I used a quality stud finder but to double check the studs exact location I used a finishing nail and hammer to find the exact sides of the stud. Glad I did because some of the stud finders locations for the center of the stud were not right.You can use longer screws than those that come with the kit (3) and mount the 3 holes of the bracket into one stud. I read where some have said this works. Didn’t seem it would be real stable so I decided to mount a 2×6 across two studs. A 2×4 is not wide enough for the bracket. I cut the 2×6’s 22” long so they overlapped the end of each stud by 3”. I attached the 2×6’s to the studs using 5/16 x 4” lag screws. I used 4 lag screws per 2×6, two on each end.You’ll need a impact driver to get the lag screws thru the board and into the stud. A regular drill won’t do it. If you don’t have an impact driver you could always muscle a socket wrench. After I drove the lag screws in as far as they would go I did have to use a socket (1/2 for the 5/16 lag screw) to finish tightening them down.I measured the bikes with the holder/ bracket to get the spacing between bikes. My measurements resulted in a spacing of 40” from the top of one board to the top of next board. For my bikes it was perfect. Your bikes may require different spacing.These type of wall mounts are perfect. Unlike other systems that are one position, usually horizontal, these allow you to adjust the arms to fit the different types of cross members as not all bikes are alike. They’re pricey, but I think they’re well worth the money. The 2x6x8 was $12.00 and the 12 lag screws were $9.00.I hope this helps if you decide to purchase these.
Isabel –
It worked okay when first installed. With wear and tear of putting bike up and down it eventually came off the wall. Product is good overall but you do have to be handy to drill into concrete with anchors
AMZ12 –
This mount looks great but needs some improvements… the locking tabs do not always stay locked… the mount is universal so the distance from the wall to the bike even at the closest setting, for my bike, still extends too far away from the wall in a 10′ wide garage to allow a vehicle to drive in without risk. With that said… I still like the mount… its stable, and looks good and with a few modifications works well.
T-Mills –
These are amazing. They’re not cheap, but you get what you pay for.I needed to mount our bikes in the garage, off the floor, and horizontally. These are the best for the buck.I found a vertical stud in our garage walls using a magnet to find the screws, and marked the wood stud. I used the included lag bolts, but I also have my own in case something goes wrong.But everything held. Two months later, and they mounts still haven’t sagged.All bikes weight differently, so find a stud, drill a pilot hole for each of the mounting holes, and use a cordless impact drill if you can. Heavier cheaper bikes will not hold well if you use any plastic drywall anchors! Use the wooden studs in your walls!
Nadia Pile –
I found many wall bike mounts to be expensive or complicated or bulky. This mount is affordable, easy to install (took me maybe 10 minutes for each mount) and takes up minimal space. Highly recommended for a simple and nice looking way to get your bikes off of the garage floor.
Gregger –
Love this mount! Keeps my bike as close to the wall as possible and is incredible solid and stable while properly protecting the bike frame. Absolutely no sagging and no wobble. I’ll buy another one when we get my wife a bike.
EdNo –
Super easy to install