
Sale!
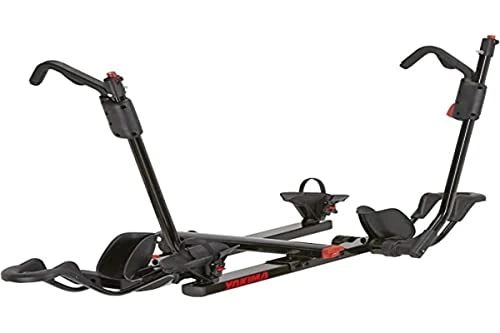
Discount 😀 HoldUp Hitch Mount Tray Bike Rack 🔔
Original price was: $263.00.$96.00Current price is: $96.00.
- Excellent customer service online in a timely manner
- Free 1 year warranty period
- fast shipping
- Streamlined service, designed for your convenience.

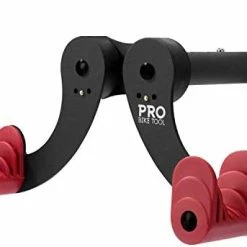
- Color: Black
- Brand: YAKIMA
- Item Dimensions LxWxH: 34.5 x 64 x 12 inches
- Item Weight: 49 Pounds
- Is Foldable: No
- Load Capacity: 60 Pounds
- Mounting Type: Hitch Mount
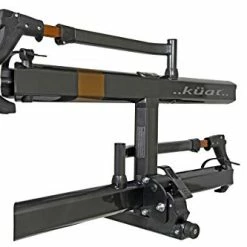
- Smart design: Tilts down with bikes loaded so you can access the back of your vehicle; Accommodates disc brakes, thru-axles and full suspension bikes
- Unrivaled spacing: Carries 2 bikes out of the box, or 4 bikes with optional HoldUp +2. 1-1/4″ or 2″ Hitch Receiver; Side-to-side adjustability to adjust space between bikes
- Easy install: SKS Locks included for added security; +2. 1-¼-inch or 2-inch Hitch Receiver required
- We’ve got your back guarantee: Covered by our Limited Lifetime Warranty
| Size | 1 1/4-Inch, 2-Inch |
|---|
3 reviews for Discount 😀 HoldUp Hitch Mount Tray Bike Rack 🔔
Add a review
Related products
Sale!

Car Racks, Transportation & Storage
Original price was: $134.96.$84.00Current price is: $84.00.
Sale!
Car Racks, Transportation & Storage
Original price was: $25.99.$18.19Current price is: $18.19.
Sale!

Car Racks, Transportation & Storage
Original price was: $58.99.$41.29Current price is: $41.29.
Sale!

Car Racks, Transportation & Storage
Original price was: $39.95.$27.97Current price is: $27.97.
Sale!
Car Racks, Transportation & Storage
Original price was: $199.00.$83.00Current price is: $83.00.
Sale!
Car Racks, Transportation & Storage
Original price was: $16.16.$11.31Current price is: $11.31.
Sale!
Car Racks, Transportation & Storage
New 💯 Racks Sherpa 2.0-2 Bike Rack Black Metallic/gray Anodize 🧨
Original price was: $246.00.$91.00Current price is: $91.00.
Sale!
Car Racks, Transportation & Storage
Best Pirce ⭐ XLC Unisex’s VS-F01 Bike Stand, Black, One Size ✨
Original price was: $65.00.$45.50Current price is: $45.50.
KWells –
When looking for a bike rack, I had several requirements: stability, no frame contact with my bike frame, the ability to fold up when not in use, and quality construction. This Yakima rack met 3 of those 4 requirements very well, but the last item could probably use a little improvement.I got the model for the 2″ receiver and installed this on a RAV4.Packaging and installation:The item was received in a single box and was well packaged. Contact between the assemblies was not a problem, and none of the assemblies were damaged or scratched. Installation took about 45 minutes and was a basically just following the instructions. The instructions themselves were very good, with pictures showing the steps during the installation process. Several tools and all necessary hardware were included need for the installation.Using this rack:I tote around a very expensive bike and after about a dozen trips, the rack has performed good enough to earn my trust. After my first few trips, I stopped every so often and checked how it was handling, but I don’t feel I need to do that now. Contact with the wheels is snug – the straps have never loosened by themselves and the arm’s grip has stayed solid. A cable lock is installed in each arm that can be used to secure your bike – these cable locks are at best a slight deterrent to a would-be thief, but they would slow them down and add a little extra security when travelling.When driving, the rack has very little sway and vibration. Hard turns, highway speeds, fast stops, and bumpy roads were not a problem.Installing and removing my bike is very quick – easily under a minute. When the rack isn’t in use, the arms tuck under the wheel holders and the rack folds vertically. The rack won’t overfold, so I don’t have to worry about it folding into the back on my car beyond it’s stop.Quality of construction:The construction quality of the rack was ok, but I see a few areas where improvement needs to be made and might cause long-term problems.In the Northwest, it rains often. After about 4 days of rain, the sun decided to come out – when I went to load my bike, I moved the arm and noticed a brown water coming out around the bottom arm pivot. When I pulled the lock cable, it was covered in a brown residue – rust. Both arms had this issue, so I suspect the inside of the arm’s are rusting. It would of been nice if the extra manufacturing work was performed to slow down the rusting. Externally, the rack still looks new and shows no sign of rust. For now, I occasionally spray a shot of WD-40 inside the tube to help prevent rust. Some of this rusty soup has sprayed on the back bumper of my car during driving (be sure to clean it off promptly!).After a few more weeks on on and off again rain, the arm became very hard to move. Again, WD-40 came to the rescue – this time I sprayed the cracks around the arm pivot. The arm eventually loosened up.The hitch pin lock on my rack didn’t work. The pin inside the lock wouldn’t move (stuck unlocked) and wouldn’t stay attached to the hitch pin. In the end, I didn’t use this lock.I’ve had one case where the cable lock has popped out of an unused arm when toting a single bike. The end of the cable was about an inch from the road, so it wasn’t damaged.Yakima does list replacement parts for these racks on their website, which is a good thing.Update: 06/15/2014I took another look at the lock and was able to get the pin to pop out with some finessing. I added the lock to the hitch for some extra security when I go to more remote areas.After some more long trips, the rack has no major problems. The rack is still solid and is holding up well.
The Rolling’s –
I did a lot of research before I decided to purchase the Yakima HoldUp Tray Style Bike Rack.During my research phase I happened to be in Summit County in the mountains of Colorado. The local buses has bike racks for riders and all the buses have tray style mounts. It made me shift from a hanging style rack to tray. If buses choose try style given the endless variations of bikes there must be a reason.I studied the physics of bike carriers and realized the hanging style racks that connect via 2″ or 1.25″ hitch mount put a lot of stress on the rack and trailer hitch. Certainly they are engineered for the stress, but why put needless stress into the equation in the first place.I also noticed the tray style racks actively manage the sway and inter-play between bikes. The hanging style allow bikes to sway and potentially knock into each other. They require bungie cords or straps to hold the front tires in place. Tray mounts on the other hand actively hold the bikes preventing swaying and knocking into each other.The final reason I chose a tray mount was visibility. All the hanging mounts obstruct the rear windows of the vehicle. This obstruction is guaranteed when bikes are mounted. The tray style does not obstruct the window and in many cases the bikes don’t raise the the level of obstructing the rear windows.This obstruction or lack thereof does have a downside for tray style. They are not visible when backing up creating an increased risk of backing into something.After all my research it came down to two choices; 1) YAKIMA 2) THULE. Both offer “Systems” that enhance the synergy of purchasing bike rack, roof cargo carriers and kayak holders. Things like universal keying (one key for all locks) and common tools which is convenient. Both have excellent quality reputations.What swayed my decision was two things:1) Quantity of bikes – the Yakima tray system allows up to four bikes2) Bike, Cargo and Kayak systems – we plan to purchase all three mounting systems and strongly desire the ability to key them all the sameYAKIMAThe HoldUp Tray Bike Rack is extremely well made. From the gauge of steel to the paint to the securing mechanisms everything is high quality. This quality comes at the cost of weight. The rack is rather heavy and that is especially the case when you add the additional 2 bike attachment (allowing 4 bikes to be carried).Assembly was straightforward and the instructions clear and easy to follow. It took me about 60~90 minutes to assemble. I took my time first unpacking all the parts, reading through the instructions twice and slowly assembling the unit. It could easily be assembled in approximately 45~30 minutes if you have two people.Mounting is obviously easy simply inserting the bike rack into the trailer hitch. It can be cumbersome given the weight. The mounting pin (inserts through the rack and trailer hitch) is threaded and screws in easily. The final tightening can be tedious because there is little space between the pin/bolt, the mounting rack and the hitch mounting apparatus.The mechanism to swing the loaded tray mount down to access the rear vehicle doors is very very nice. It is easy given the squeeze clip-n-pin. Of course swinging the rack back up into place loaded with bikes requires significant strength (you are lifting bikes and the heavy gauge tray mount after all).The mechanism to fold the rack up up against the vehicle is nice when not carrying bikes. It interfered with my SUV’s backup sensors so I was force to toggle those off when I had the empty tray mount folded upwards.SUGGESTIONSAfter mounting and unmounting the rack several times I made a changes to make it much easier.A) I purchased separate ratchet wrench (not socket but ratcheted wrench) making it much much easier to thread and tighten/untighten the mounting pin. I STRONGLY RECOMMEND purchasing a ratcheting wrench.B) I bought a Sharpie Oil-Based Paint Marker Medium Point Silver and once I had the rack inserted properly into the hitch I drew a line with the marker on the hitch and mount. This line allows me to single handedly insert the rack into the hitch exactly the right depth without having to stop, check, and push/pull the rack to align the mounting hole. Given the marker was permanent and a bit “runny” I chose to surround the areas I was drawing on with masking tape. This kept excess marker ink from bleeding all over the metal around where I was drawing. I like my stuff to look good.If these two changes are not clearly described simply respond and I’ll get a couple photos uploaded. These changes makes the process of solo installing and uninstalling much easier and faster. Yes they involve a $6 permanent paint marker and a $20 wrench, but well worth the investment.
AA –
The rack was easy to install, with all the required tools included. The integrated locks and the lock for the hitch bolt all worked with no problems. The rack is very sturdy, which does cause it to be heavy and a little difficult to put on and take off the vehicle. I would definitely recommend this rack to anyone looking for a rack.